BUILD AND INSTALL THE COMMAND APPLICATION
YKUSH 3 uses the same control application as other YKUSH boards, the ykushcmd.
This application is made available as an open source software.
It can be downloaded from
YKUSH 3
product page.
Also an up-to-date version with the latest developments is available in the
Yepkit/ykush GitHub
repository.
Prerequisites
To build the application, and run it, libusb and libusb-dev library must be installed in you system.
For example, in Debian based systems do the following in a terminal.
$
sudo apt-get install libusb-1.0-0-dev
This installed the development files.
Now install the binary library.
$
sudo apt-get install libusb-1.0-0
Building and installing
Download the source code package from
YKUSH 3
product page
or from
Yepkit/ykush GitHub
repository.
Extract the content of the source code archive to a folder of your choosing.
In the root of the source code structure you will find the following two scripts:
As the name indicates one builds the application and the other installs it.
To build the application run:
$
sudo ./build.sh
Please note that this script downloads and builds the hidapi library, so an Internet connection is
required.
For more detail on the hidapi library please follow this
link.
There may be some dependencies that were not satisfied and cause the build process to fail.
If that was the case, install the missing dependencies and re-run the build.sh script.
Finally install the hidapi shared libraries and the ykushcmd command by running the following
script.
$
sudo ./install.sh
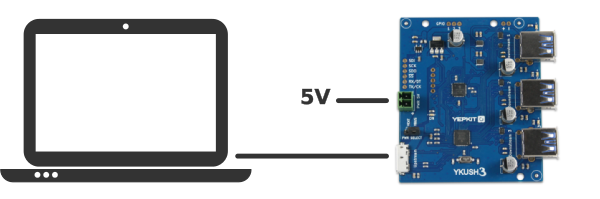
The basic connections to operate the board are the Upstream connection to the Host port (tipicaly a PC USB port) and optionally the external power input connection.
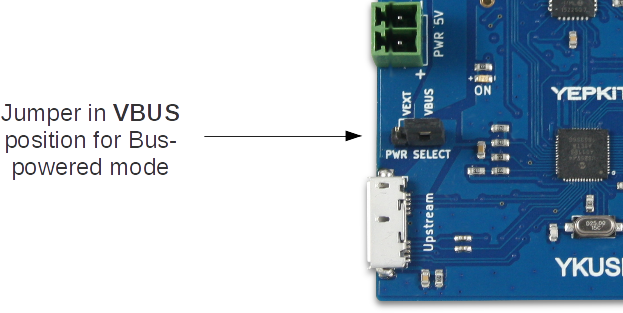
If only low power devices will be connected to YKUSH 3, the Bus-powered mode can be used.
To connect the board using the Bus-powered mode start by ensuring that the on-board jumper is in the VBUS position, then connect the upstream port (the Micro USB 3.0 terminal) to the host USB port (eg,
the USB port of a PC).
And that's it.
If higher power devices are to be connected (e.g., USB drives, wireless dongles, etc) the use of the Self-powered mode for YKUSH 3 is recommended.
In this mode the YKUSH 3 board will source the power from the external power input.
To connect the board using the Self-powered mode start start by ensuring that the on-board jumper is in the VEXT position, next connect the PWR 5V to a 5V power supply and finish by connecting the upstream to the Host USB port.
At this point the
YKUSH 3 board
is ready to use.
Controlling the switching of the downstream ports
Use the following commands to control the On/Off of the devices
connected to the YKUSH 3 board downstream ports.
Power down a device connected to YKUSH 3 board downstream port 1:
$
ykushcmd ykush3 -d 1
Power up a device connected to YKUSH 3 board downstream port 1:
$
ykushcmd ykush3 -u 1
Power down a device connected to YKUSH 3 board downstream port 2:
$
ykushcmd ykush3 -d 2
Power up a device connected to YKUSH 3 board downstream port 2:
$
ykushcmd ykush3 -u 2
Power down a device connected to YKUSH 3 board downstream port 3:
$
ykushcmd ykush3 -d 3
Power up a device connected to YKUSH 3 board downstream port 3:
$
ykushcmd ykush3 -u 3
Controlling a specific board when multiple YKUSH 3 boards are connected to the same host
When more than one YKUSH 3 board is connected to the host, the action option in the command should be preceded by
-s serial_number option.
The serial_number is the serial number of the YKUSH 3 board where the action is to be executed.
To find out the serial number of a YKUSH 3 board, connect it to the host and execute the command:
$
ykushcmd ykush3 -l
This command will output the serial number of the connected YKUSH 3 boards.
Note that if more than one board is connected when this command is executed the serial number of all connected YKUSH boards
will be listed.
As an example, assuming that two YKUSH boards are connected with the following serial numbers:
- YKUSH 3 board 1 - YK00005
- YKUSH 3 board 2 - YK00009
To switch ON the downstream port 3 of YKUSH 3 board 1 we execute the command:
$
ykushcmd ykush3 -s YK00005 -d 3
Getting a downstream port status
To get the current switching status (UP/DOWN) of a downstream port use a command with the following
format.
$
ykushcmd ykush3 -g port_number
For example, if you want to get the status of downstream port 1 the command is the following.
$
ykushcmd ykush3 -g 1
Again, if more than one YKUSH 3 board is connected to the host "-g" option should be preceded by the "-s
serial_number" option to address the command to the board with the specified serial number.
Controlling the 5V output port
To switch ON the 5V output port the command is the following.
$
ykushcmd ykush3 -on
To switch OFF the 5V output port the command is the following.
$
ykushcmd ykush3 -off
Controlling the GPIOs
The board has three digital GPIO ports which can be written and read with the ykushcmd application.
If the user writes the value 1 to a GPIO it will be set to logical High level (aprox 3.3V).
If the user writes the value 0 to a GPIO it will be set to logical Low level (aprox 0V).
Similarly, when reading from a GPIO a logical Low will be represented by a 0 value and a logical High by a 1 value.
For example, to set the GPIO 1 to logical High we should write the value 1 to it and the command is the following.
$
ykushcmd ykush3 -w 1 1
To set the GPIO 3 to logical High the command is the following.
$
ykushcmd ykush3 -w 3 1
To set the GPIO 2 to logical Low the command is the following.
$
ykushcmd ykush3 -w 2 0
To Read the GPIO 1 the command is the following.
$
ykushcmd ykush3 -r 1
Setting the configuration parameters
The board factory default configuration is to have all downstream ports at ON state on power-on,
which means that every time the board is rebooted it will reset all downstream ports to the ON state.
The user can change this behavior by altering the configuration parameters.
Please refer to the documentation for detailed information about the available configuration parameters.
Bellow we present some examples of configuration commands to change the default state of the downstream ports.
To configure the default state of the downstream port 1 to be OFF at power-on (boot) the command is the following.
$
ykushcmd ykush3 -c 1 0
To configure the default state of the downstream port 2 to be OFF at power-on (boot) the command is the following.
$
ykushcmd ykush3 -c 2 0
To configure the default state of the downstream port 3 to be OFF at power-on (boot) the command is the following.
$
ykushcmd ykush3 -c 3 0
To configure the default state of the downstream port 1 to be persistent,
in other words, to maintain after reboot the state it had before the reboot, the command is the following.
$
ykushcmd ykush3 -c 1 2
Reseting the board
To reset the board the command is the following.
$
ykushcmd ykush3 -reset
For additional support, you can reach us through the form in our
support page.
For more information and resources for the YKUSH 3 board please visit the
product page.